MCTS sertifikasyonumuna yeni bir konu daha ekledim. .NET Framework 2.0 Web applications’dan sonra artık ASP.NET 3.5 kategoriside sertifikasyonumun içerisine girdi…

MCTS sertifikasyonumuna yeni bir konu daha ekledim. .NET Framework 2.0 Web applications’dan sonra artık ASP.NET 3.5 kategoriside sertifikasyonumun içerisine girdi…

CREATE DATABASE [DB_ADI] ON
( FILENAME = N’MDF_DOSYASI‘ ),
( FILENAME = N’LDF_DOSYASI‘ )
FOR ATTACH
GO
Yukarıdaki kod ile SQL Server’da attach işlemini yapabiliriz. Bu kod SQL Server 2005 ve SQL Server 2008 de geçerli,SQL Server 2000’de “sp_attach_db”(stored procedure) çalıştırmak gerekli.
Başarılı bir Team Foundation Server yükleme işleminden sonra client’larda Visual Studio 2008’dan Team Explorer aracılığıyla yeni proje yaratırken aşağıdaki gibi bir hata alıyorsak ilk yapmamız gereken işlem Visual Studio 2008 SP1’i yeniden kurmak olmalı.
Error
TF30004: The New Team Project Wizard encountered an unexpected error while initializing the Microsoft.ProjectCreationWizard.WorkItemTracking plug-in.Explanation
TF30171: The Microsoft.ProjectCreationWizard.WorkItemTracking plug-in used to create the new team project could not be initialized and returned the following error: TF26173: Team Foundation could not connect to the application tier. Check that you have a network connection and that the Team Foundation Server is available. If the problem persists, contact your Team Foundation Server administrator..User Action
Contact your Team Foundation Server administrator.
Team Foundation Server’ı sorunsuz yükledikten sonra, bu başarının vermiş olduğu sevinç projelerin raporlarını görüntülemek istediğimizde biraz sekteye uğrayabilir. TFS kurulumundan sonra Reporting Service’e müdahale etmeden çalışan bir raporlama sistemi ile ne yazık ki henüz karşılaşmadım ve duymadım. (:
Visual Studio’da Team Explorer aracılığıyla yaratmış olduğumuz projenin portal’ını açtığımızda raporları görüntülerken, ya da direk Reporting Server’ın raporlarının bulunduğu web sitesini açtığımızda aşağıdaki gibi bir hata alıyorsak yapmamız gereken bir kaç şey var.
An error has occurred during report processing. (rsProcessingAborted)
Query execution failed for dataset ‘WorkItemTypeParam’. (rsErrorExecutingCommand)
Öncelikle bunun nedenini bilmemiz lazım. SQL Server loglarına bakarsak, bir login sorunun log dosyalarına yazıldığını görürüz.Bu durum TFS’in TfsWareHouse database’ine ilgili raporları çekecek kullanıcının(bu kullanıcı kurulum esnasında belirttiğiniz ya da Reporting Service’i çalıştıran kullanıcı,ben genellikle local NETWORK SERVICE’ni kullanıyorum) ilgili yetkisi olmamasından dolayı. Bu yetkiyi vermek için aşağıdaki SQL sorgusunu çalıştırmamız gerekmekte.
USE [TfsWarehouse]
GO
CREATE USER [NT AUTHORITY\NETWORK SERVICE] FOR LOGIN [NT AUTHORITY\NETWORK SERVICE]
GO
USE [TfsWarehouse]
GO
EXEC sp_addrolemember N’TfsWarehouseDataReader’, N’NT AUTHORITY\NETWORK SERVICE’
GO
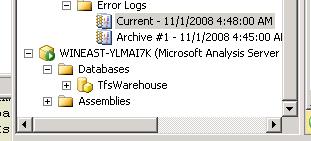
Bu sorgudan sonra raporların tekrardan process edilebiliyor olması gerekmekte.Bunun için bir kontrol yapmamız lazım.TFS bu aşamada Analysis Server’ı kullanıyor.Daha doğrusu Reporting Service’de bulunan OLAP data kaynağı Analysis Server’ı kullanıyor.OLAP data kaynağıda ilgili dataları Reporting Service’e ilgili dataları sağlayamadığından yukarıdaki hatayı alıyoruz. Yetki olayını yaptıktan sonra SQL Management Studio’dan bu sefer’de Analysis Server’a bağlanmamız gerekmekte.Databases kısmından TfsWarehouse’a sağ tıklayıp Process dememiz gerekmekte.(Çıkan ekranda OK derseniz Process işlemi başlayacaktır.)

Bu işlemin sorunsuz çalışması lazım.Bir sorun çıkarsa önceki SQL srogusunun sorunsuz ve düzgün kullanıcı ile çalıştırıldığından emin olun.
Şimdi tekrardan raporları görüntülemeye çalışın.Sorunsuz bir şekilde raporların geldiğini göreceksiniz.Benzer bir hatanın devam ettiğini görürseniz endişelenmeyin. Hata devam ediyorsa OLAP data kaynaklarının Reporting Service tarafından alınmadığındandır.
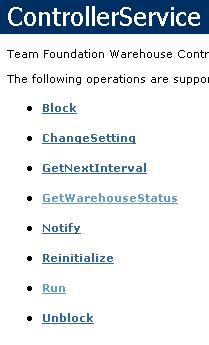
 Bu aşamada son bir şey yapmamız gerekmekte. TFS’in yüklü olduğu makinada http://localhost:8080/Warehouse/v1.0/warehousecontroller.asmx adresine gitmemiz gerekmekte.Çıkan methodlardan GetWareHouseStatus’e tıklayıp Invoke dememiz gerekiyor.Bu method Idle,ProcessingOlap,RunningAdapters ve Blocked şeklinde değerler dönmekte. Idle olana kadar beklememiz gerekmekte.Invoke’u çağırarak bunu kontrol edebiliriz.Durum Idle olduğunda,yine http://localhost:8080/Warehouse/v1.0/warehousecontroller.asmx adresinde bu sefer Run methodunu çağırmamız ve dönen değerin true oluyor olması lazım.
Bütün bu işlemlerden sonra raporlarımızın sorunsuz bir şekilde görüntüleniyor olması gerekmekte.
With Facebook Connect, you are able to integrate the Facebook Platform with your own web application. Facebook Connect does not provide many functions as Facebook itself for now but provides some very nice functions which can add values for your web applications. I am not going to mention about developing Facebook Connect application from scratch, you can find more about this from Facebook’s development pages.
What I am going to share is about integration of Facebook Connect’s functions or tools with your own web application. As a .NET developer, I did this integration with ASP.NET. So let’s start with a scenario.
As you have seen, Minepla.net use Facebook Connect and fb:comments to get comments from users. In simple way, comment mechanism is done by Facebook Platform. All comments are stored in Facebook’s data repositories as data of a Facebook Application(like Minepla.net). So everything is fine so far, cause I do not need to care about comment mechanism for my web site. But maybe I can also want to store comments in my own database for some reason. So I need to get Facebook Connect’s fb:comments properties within my page. Storing in database is not so difficult after we can send data to the server. So let’s first look how we can take the data from Facebook Connect and send to the server. First of all create an *.aspx file and put fb:comments elements to your page.
<%@ Page Language=”C#” AutoEventWireup=”true” CodeBehind=”Default.aspx.cs” Inherits=”FacebookTutorial._Default” %>
<!DOCTYPE html PUBLIC “-//W3C//DTD XHTML 1.0 Transitional//EN” “http://www.w3.org/TR/xhtml1/DTD/xhtml1-transitional.dtd”>
<html xmlns=”http://www.w3.org/1999/xhtml” xmlns:fb=”http://www.facebook.com/2008/fbml”>
<head runat=”server”>
<title>Untitled Page</title>
</head>
<body>
<form id=”form1″ runat=”server”>
<asp:ScriptManager ID=”ScriptManager1″ runat=”server” EnablePageMethods=”true”>
</asp:ScriptManager>
<div>
<script src=”http://static.ak.connect.facebook.com/js/api_lib/v0.4/FeatureLoader.js.php”
type=”text/javascript”></script>
<script type=”text/javascript”>
FB.init(“YOUR APP. KEY”, “xd_receiver.htm”);
</script>
<fb:comments id=”tut_comments”>
</fb:comments>
<div id=”info”>
</div>
</div>
</form>
</body>
</html>
With this page, you should be able to get comments from users. If users have Facebook account, they can login from their account and post a comment as a Facebook user to this page. So far there is no data stored in your application. Just a data is transferred to Facebook with help of this page. The comments are displayed in this page and also in Facebook.

Fb:comments is one of the tags in XFBML(Facebook Markup Language). To use these tags you should add xmls:fb=http://www.facebook.com/2008/fbml definition to your page. You can find other prerequisites at Facebook’s developer pages.
So now we have to take the text value from comment box and send it to the server. To do this, we are going to write some JavaScript. Here it is;
FB_RequireFeatures([“Comments”],function() {
FB.CommentClient.add_onComment(function(comment) {
PageMethods.GetComment(comment.post, OnSucceeded, OnFailed);
});
});
function OnSucceeded(result, userContext, methodName) {
document.getElementById(“info”).innerHTML = result;
}
function OnFailed(error, userContext, methodName) {
}
With FB.CommentClient.add_onComment() function we are adding a function when user click send comment button on comment box. What we are writing in this function is just about PageMethods in Asp.net Ajax. The important thing in here is the parameter which is comment.post. Comment.post is the value in comment box. For this example we have just simple method in code behind.
[WebMethod]
public static string GetComment(string comment)
{
return “This comment: ” + comment + ” is written @” + DateTime.Now;
}
After sending values to server, do what you want to do.It is all yours now. So this is all. The main concept is just like this.In future, I am going to tell you more about Facebook Connect’s javascript API with Asp.Net examples…
You may find the online example of this article in here.